On-Demand Dagger Engines with Argo CD, EKS, and Karpenter
Introduction
Upgrading a key piece of your infrastructure is always challenging. We need to avoid downtime while also making new versions available to users as soon as they become available. As a result, we want to avoid doing in-place upgrades.
Dagger is no exception - we want users of the CI to simply target new Dagger Engine versions as they come available. In this blog post I will show how you can leverage Argo CD, AWS EKS, and Karpenter to deploy self hosted GitHub Actions runners and Dagger Engines in a way that streamlines Dagger upgrades in production.
Horizontal vs Vertical Scaling
First, we need to mention a few things regarding the two ways to scale Dagger Engines in production: horizontal vs vertical scaling. With horizontal scaling, Dagger Engines are ephemeral processes that will show up and go away based on queued pipelines. This means they are short lived, do not directly benefit from persistent local storage for cross-run caching, and have the potential of reducing costs as usage decreases. In contrast, with vertical scaling you have “monolithic” long lived Engines that run all/most of your pipelines. These Engines can leverage persistent local storage for caching steps on subsequent runs, but can potentially be more costly if usage varies significantly. If you are interested in knowing more about this topic you can check out this GitHub issue where we are actively discussing the trade offs of each approach.
While the approach described in this post can be adapted for vertical scaling, it is specifically built for horizontal scaling (by leveraging Karpenter). We leave the topic of vertical scaling with dynamic Dagger Engines for a later post, please reach out via Discord if this is something you’re keen to see prioritized.
Setup
Requirements
To follow along with this blog post, you will need an AWS EKS Cluster with Argo CD and the argocd-github-release-generator plugin installed. We will use this as a starting point for creating a production ready setup that, at the time of this writing, is being actively used in Dagger’s main repository, github.com/dagger/dagger.
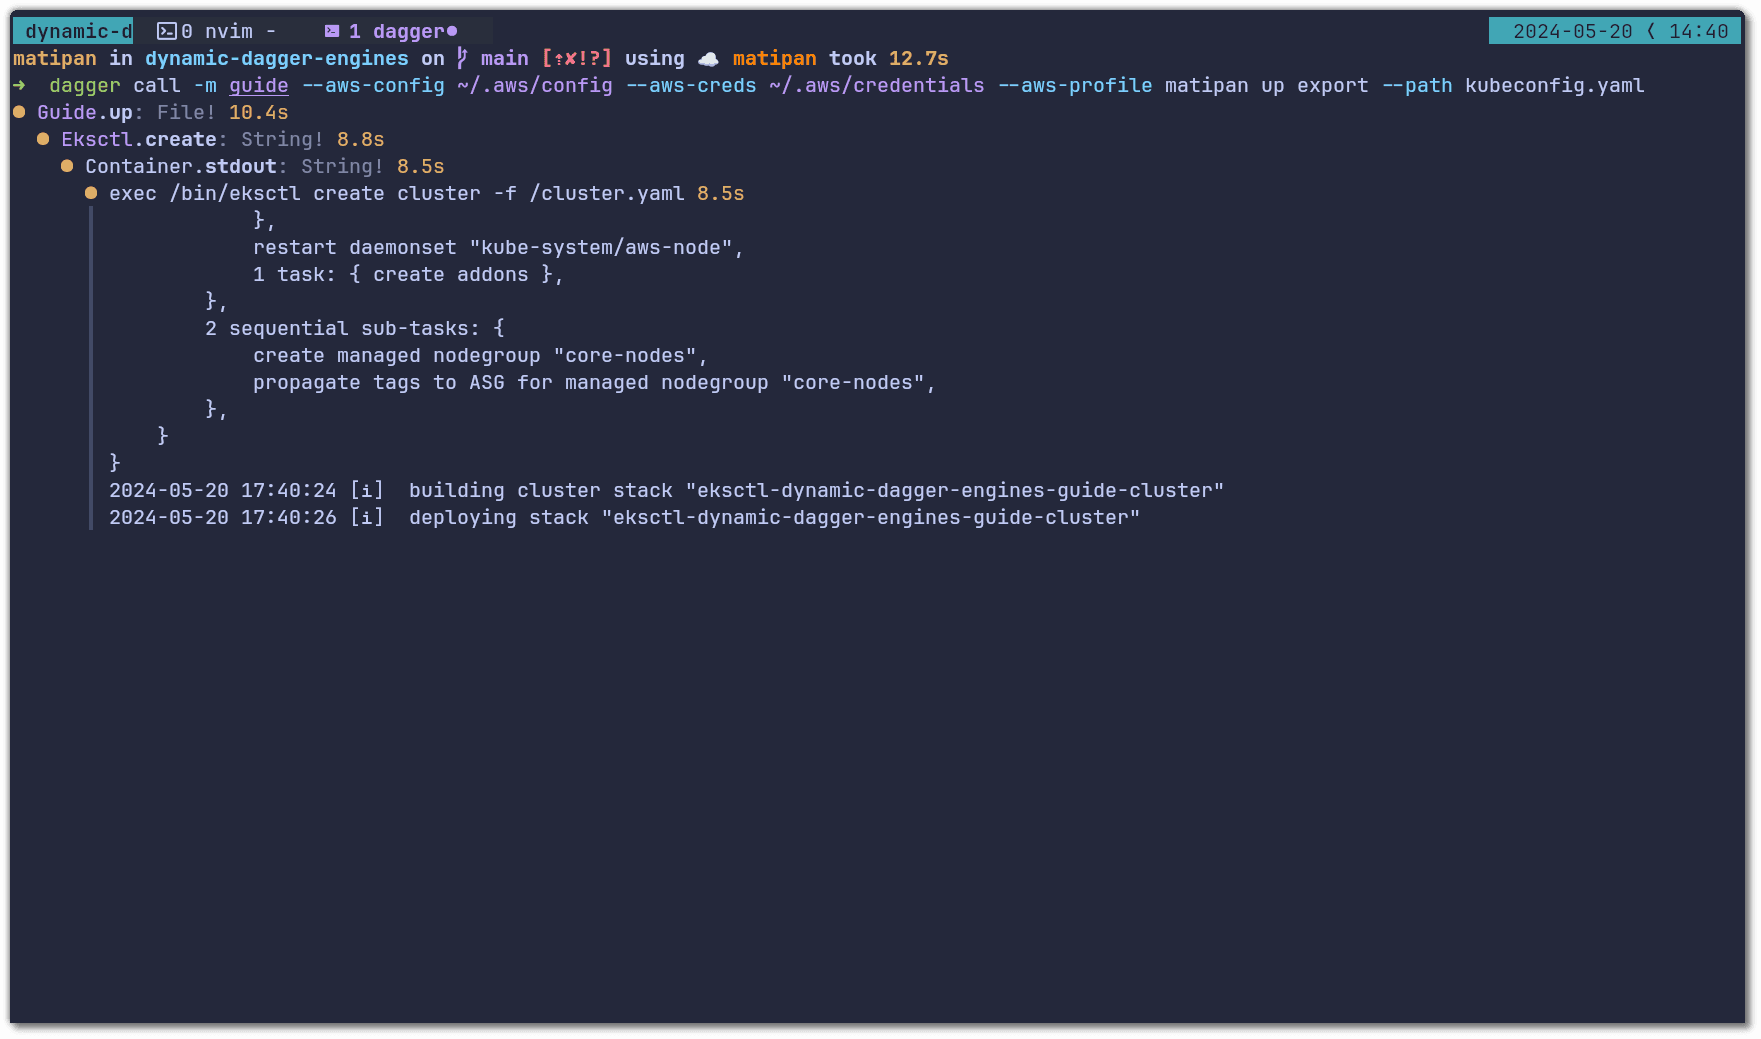
To simplify this initial setup, we created a Dagger module that will get you up and running with everything you need by running a single Dagger call. This function will provision an AWS EKS Cluster with Argo CD and the plugin already installed and save the kubeconfig in the working directory. The provisioned cluster has 2 x t3.medium nodes on us-east-2 and would cost approximately $133 USD per month:
dagger call --mod github.com/matipan/dynamic-dagger-engines/guide --aws-creds ~/.aws/credentials --aws-profile "$AWS_PROFILE" up export --path kubeconfig.yaml
💡When you are finished exploring this setup in your infrastructure, you can use the teardown function to delete all resources.
If you are cautious about giving AWS credentials to some stranger’s Dagger module (as you should) you can review the module’s code here. If you already have an EKS cluster with Argo CD installed, you can easily install the release generator plugin by following this documentation.
Developer Experience First
When you are building things for other developers, it is a good idea to start with defining the ideal developer experience (DX). In our case, we want developers to target a specific Dagger Engine version by simply specifying it in their workflow, e.g.:
runs-on: dagger-v0-11-1
We want new Dagger versions to be automatically available, so that when a new version gets released, a developer simply needs to update the runs-on value, e.g.
runs-on: dagger-v0-11-4
Implementation
In order to dynamically generate the Kubernetes resources for our infra we will leverage Argo CD’s ApplicationSet with the plugin we previously mentioned, argocd-github-release-generator.
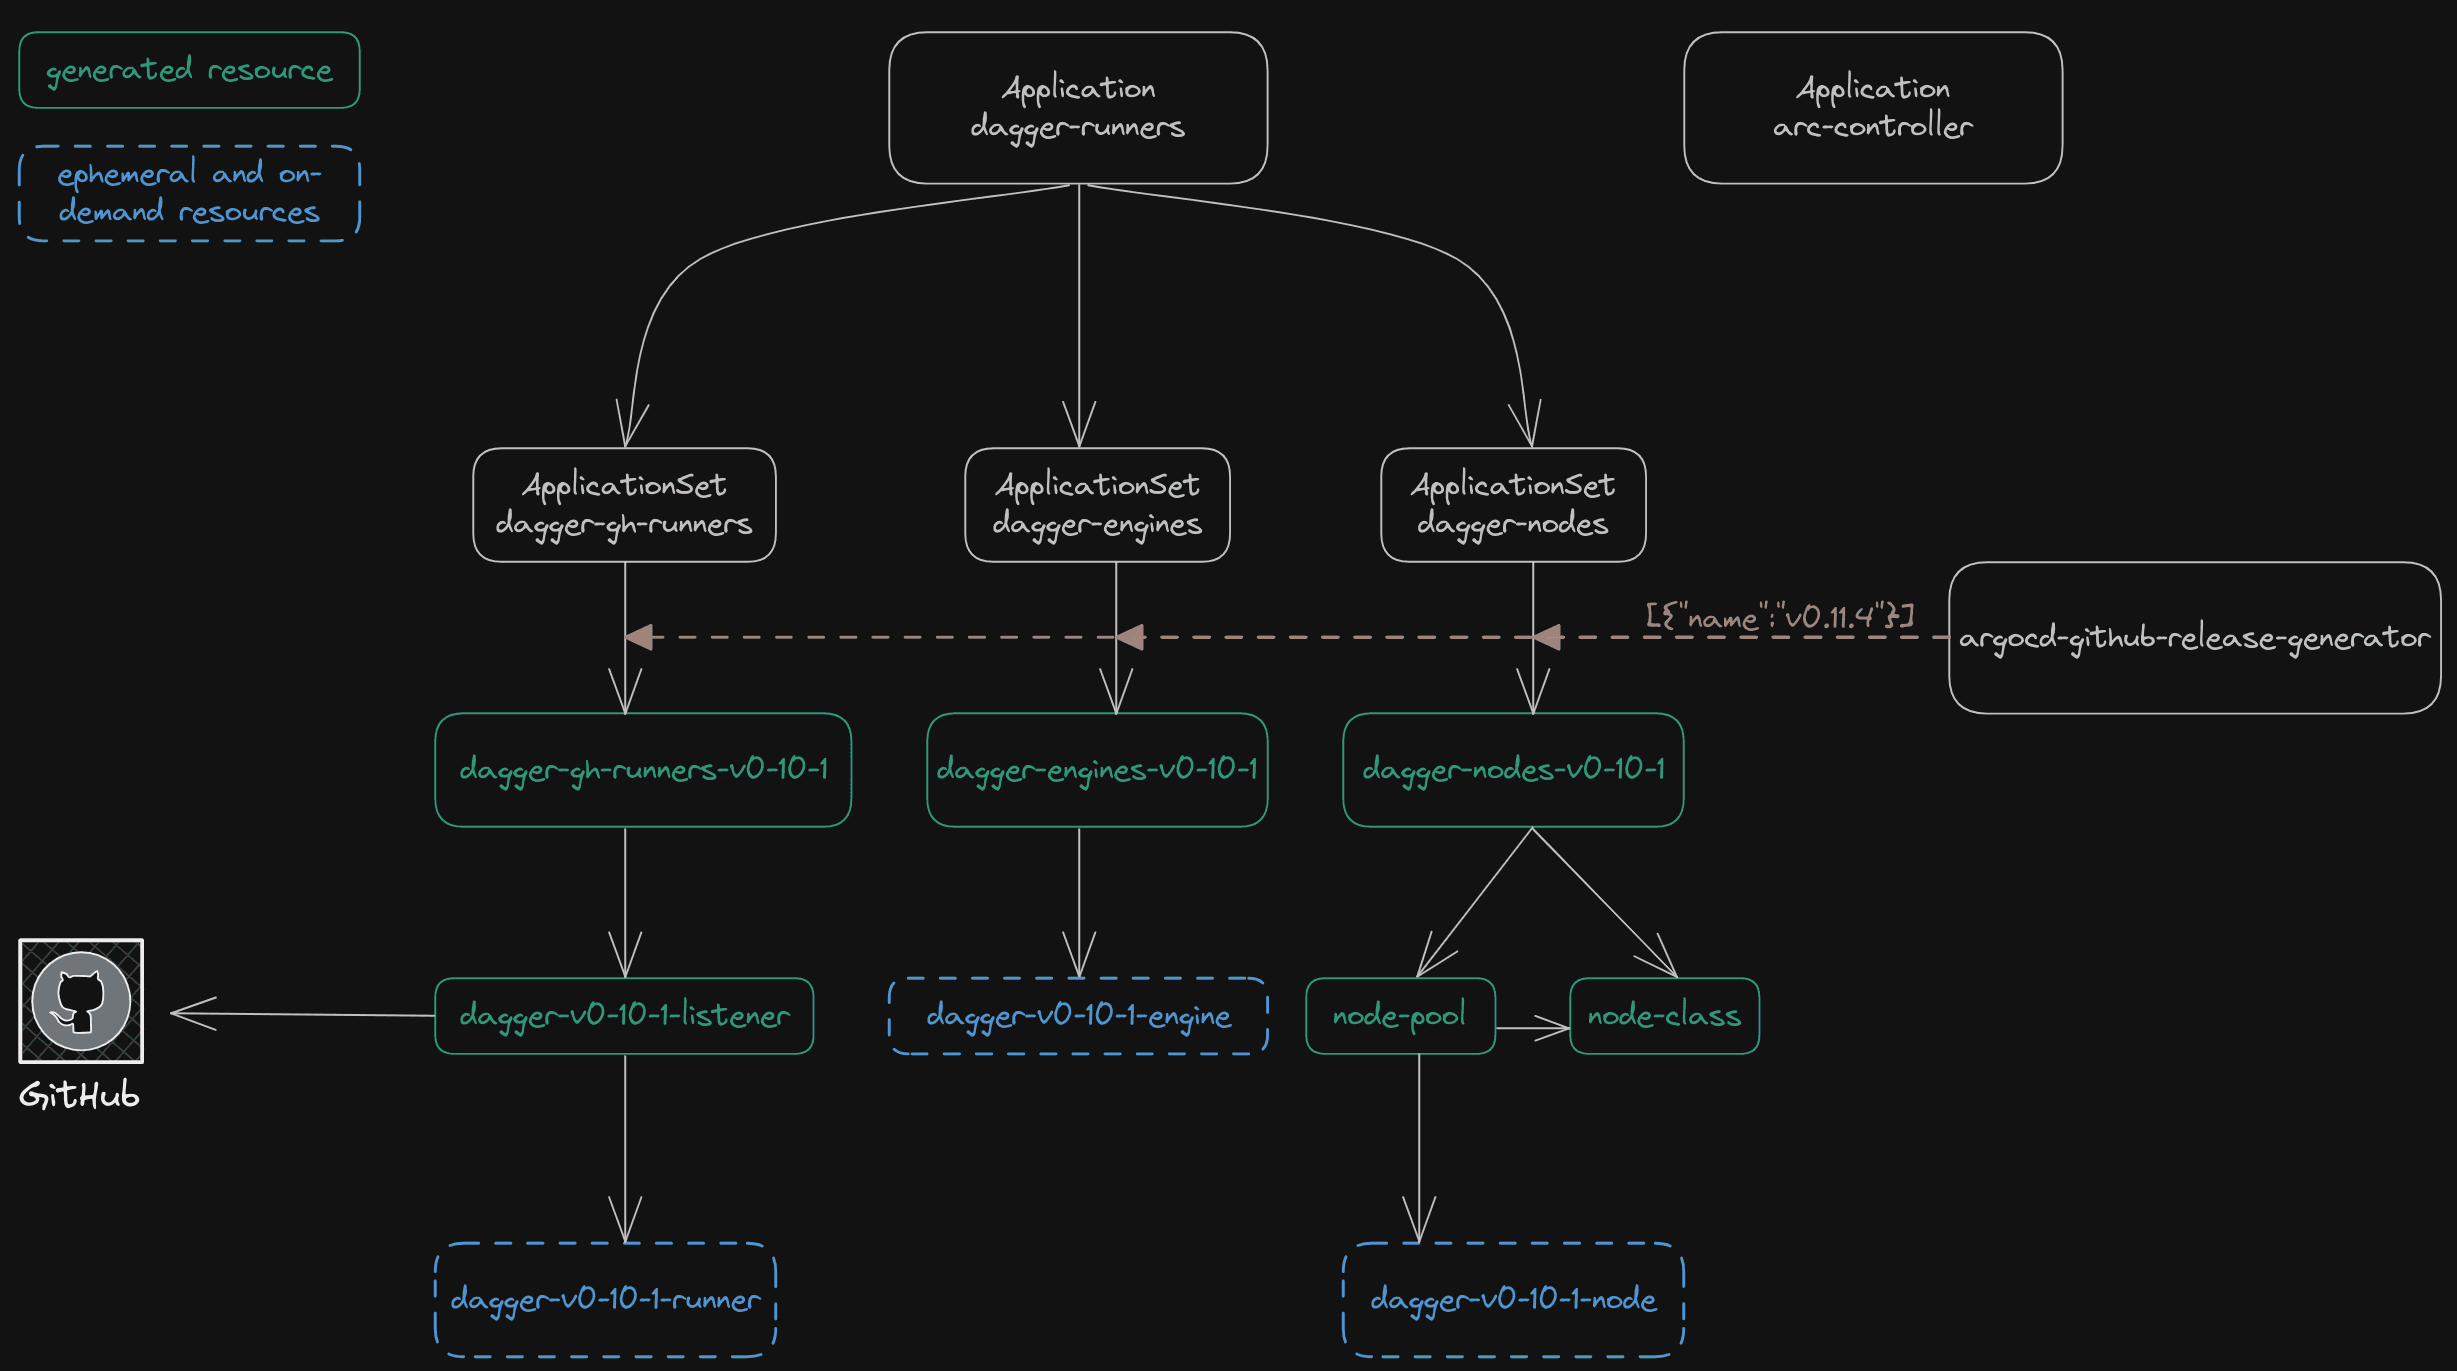
In the diagram below, we show the required base components, as well as the automatically generated components:
There are two top level applications: dagger-runners and arc-controller.
The arc-controller deploys the Kubernetes Operator that manages the CRDs deployed in GitHub Runners. We won’t delve into the details of this controller because it is not relevant for this blog post. You can find further instructions on deploying GitHub Actions Runner Controller in the official documentation.
The dagger-runners Application manages three ApplicationSets:
- dagger-gh-runners: deploys GitHub’s Application Runner ScaleSet that is composed of a Listener that looks at GitHub repositories and creates Runner Pods based on Jobs that get queued.
- dagger-engines: deploys the actual Dagger Engine by leveraging Dagger’s official Helm chart.
- dagger-nodes: deploys Karpenter’s NodeClass and NodePool that tell Karpenter which kind of Nodes should be provisioned for our GitHub Application Runners and Dagger Engines.
We want isolation between different Dagger versions. GitHub runners for version v0.11.1 should only talk to Dagger Engines v0.11.1, and these pods should only be deployed on a node that is exclusive to v0.11.1 workloads. To achieve this isolation we use the argocd-github-release-generator plugin on each ApplicationSets to generate one Application per targeted Dagger version:
generators:
- plugin:
    configMapRef:
      name: argocd-github-release-generator
    input:
      parameters:
        repository: "dagger/dagger"
        min_release: v0.11.1
    # tell Argo CD to query this generator every 120 seconds
    requeueAfterSeconds: 120
This plugin tells Argo CD to create one Application for each release found in github.com/dagger/dagger which is greater than v0.11.1. By leveraging the parameters provided by this plugin we can customize each ApplicationSet to achieve the required isolation.
To install you will first clone github.com/matipan/dynamic-dagger-engines and configure two parameters in dagger-gh-runners.yaml:
- githubConfigUrl: URL that points to the organization or repository where GitHub Actions Runners will register (i.e repository where users will target runners with runs-on).
- githubConfigSecret: secret name that contains the credentials to authenticate with GitHub’s API. Learn more about setting up the secret in the official documentation. Make sure you create this secret in the dagger-runners namespace.
Once the secret is created, and these two files are configured for your setup, you can install the ApplicationSets by applying the argocd directory:
kubectl apply -f ./argocd
After the above command succeeds, you may want to check that the runners registered with your GitHub repo/org:
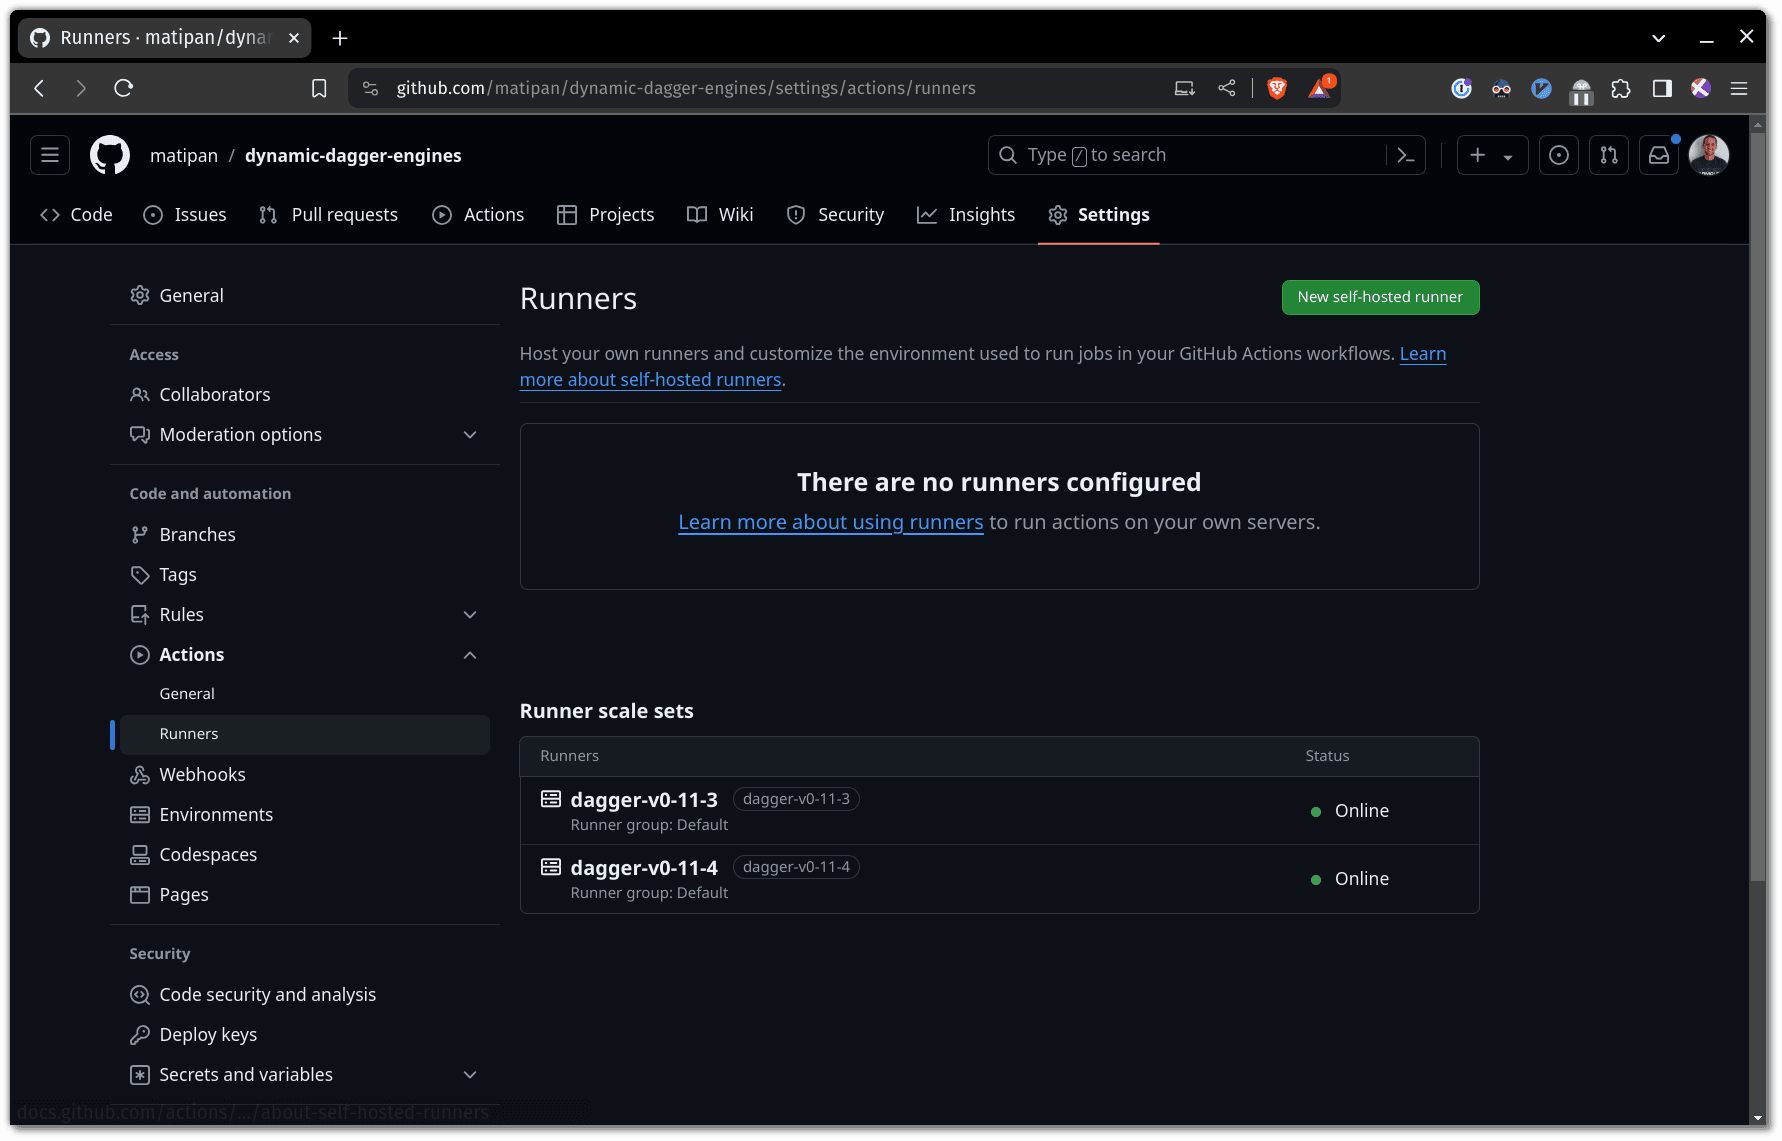
With all the above done, let’s try to better understand how we configure each ApplicationSet.
Github Runners
Deploying Github Runners looks a bit daunting because there are many moving pieces. Having said that, the Helm chart makes the deployment straightforward. In the configuration below, we are setting up runners that:
- Are named and advertised to GitHub as
dagger-v(e.g dagger-v0-11-4) - Install dependencies every time a new runner starts
- Have the correct Dagger CLI pre-installed (Engine and CLI versions must match)
- Do not have Docker-in-Docker (DinD) enabled
You can check out the entire spec for this application here.
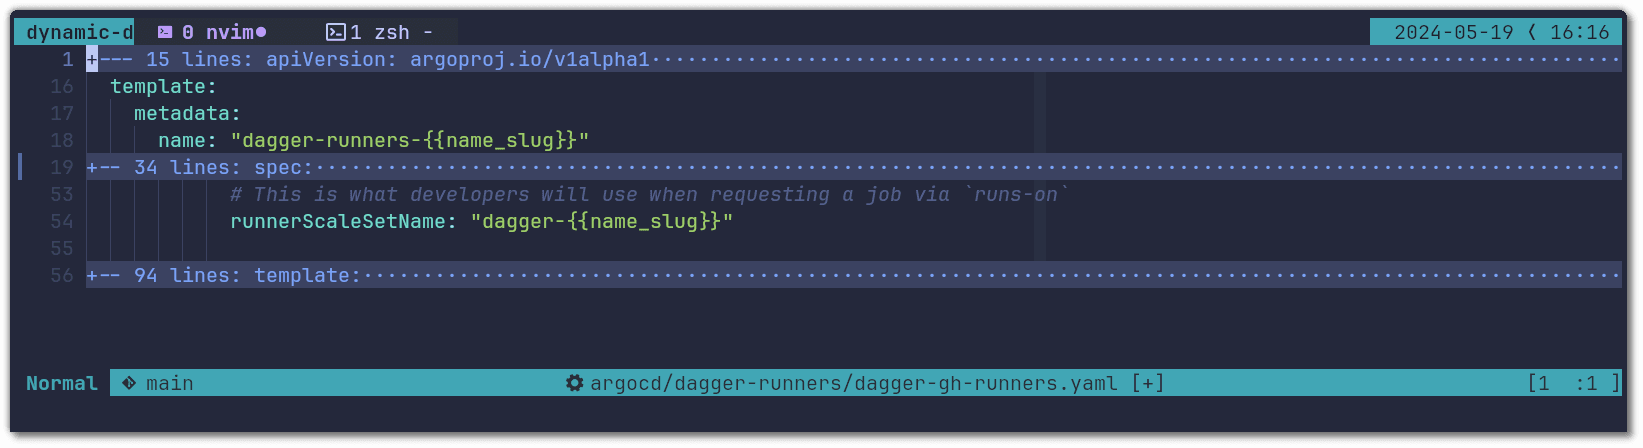
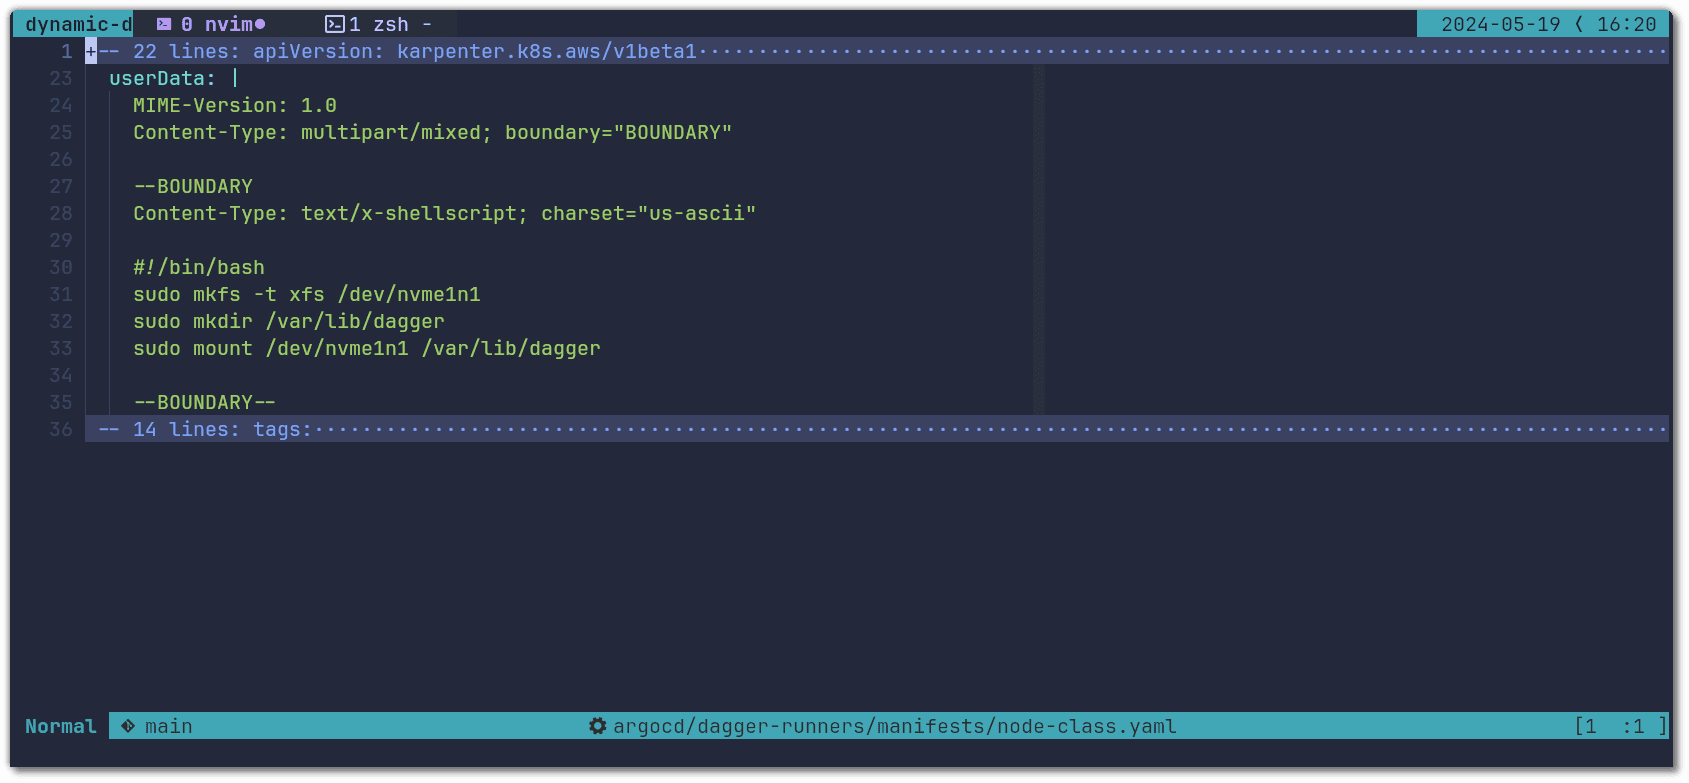
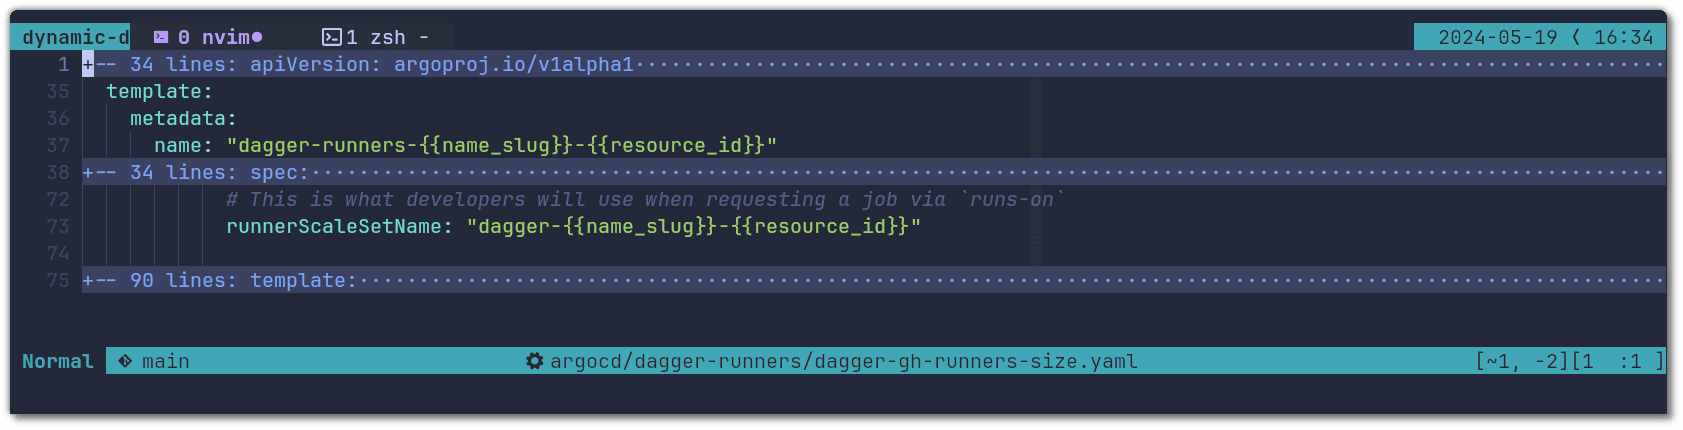
We first configure the runner name on GitHub (as shown in the first screenshot). To do this we use the name_slug. This variable is made available by the argocd-github-release-generator and it is a URL friendly version of the Dagger version (e.g name_slug=v0-11-4):
We then install the dependencies for our runners. The main one being the Dagger CLI. To install it, we use an init container that shares the volume of the Dagger CLI binary with the runner container. The templated variable {{name}} used below is made available by argocd-github-release-generator and holds the value of a specific Dagger version, e.g v0.11.4:
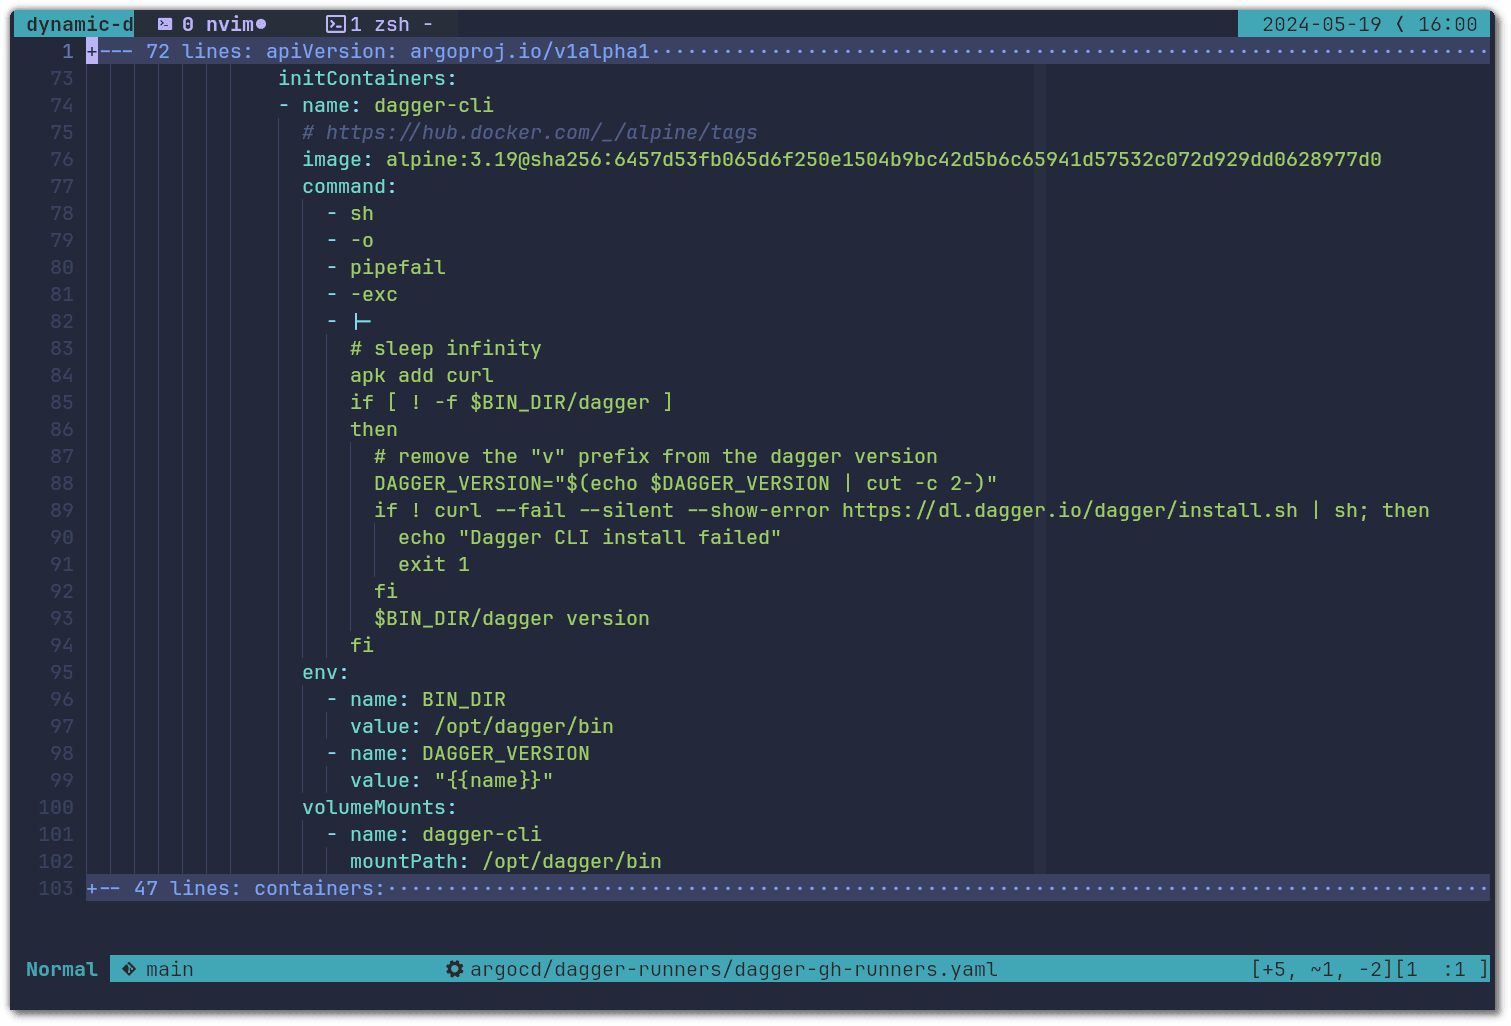
The Dagger CLI connects from the runner container to the Dagger Engine using the volume mount at /var/run/buildkit & the _EXPERIMENTAL_DAGGER_RUNNER_HOST environment variable (see Custom Runner - Connection Interface doc):
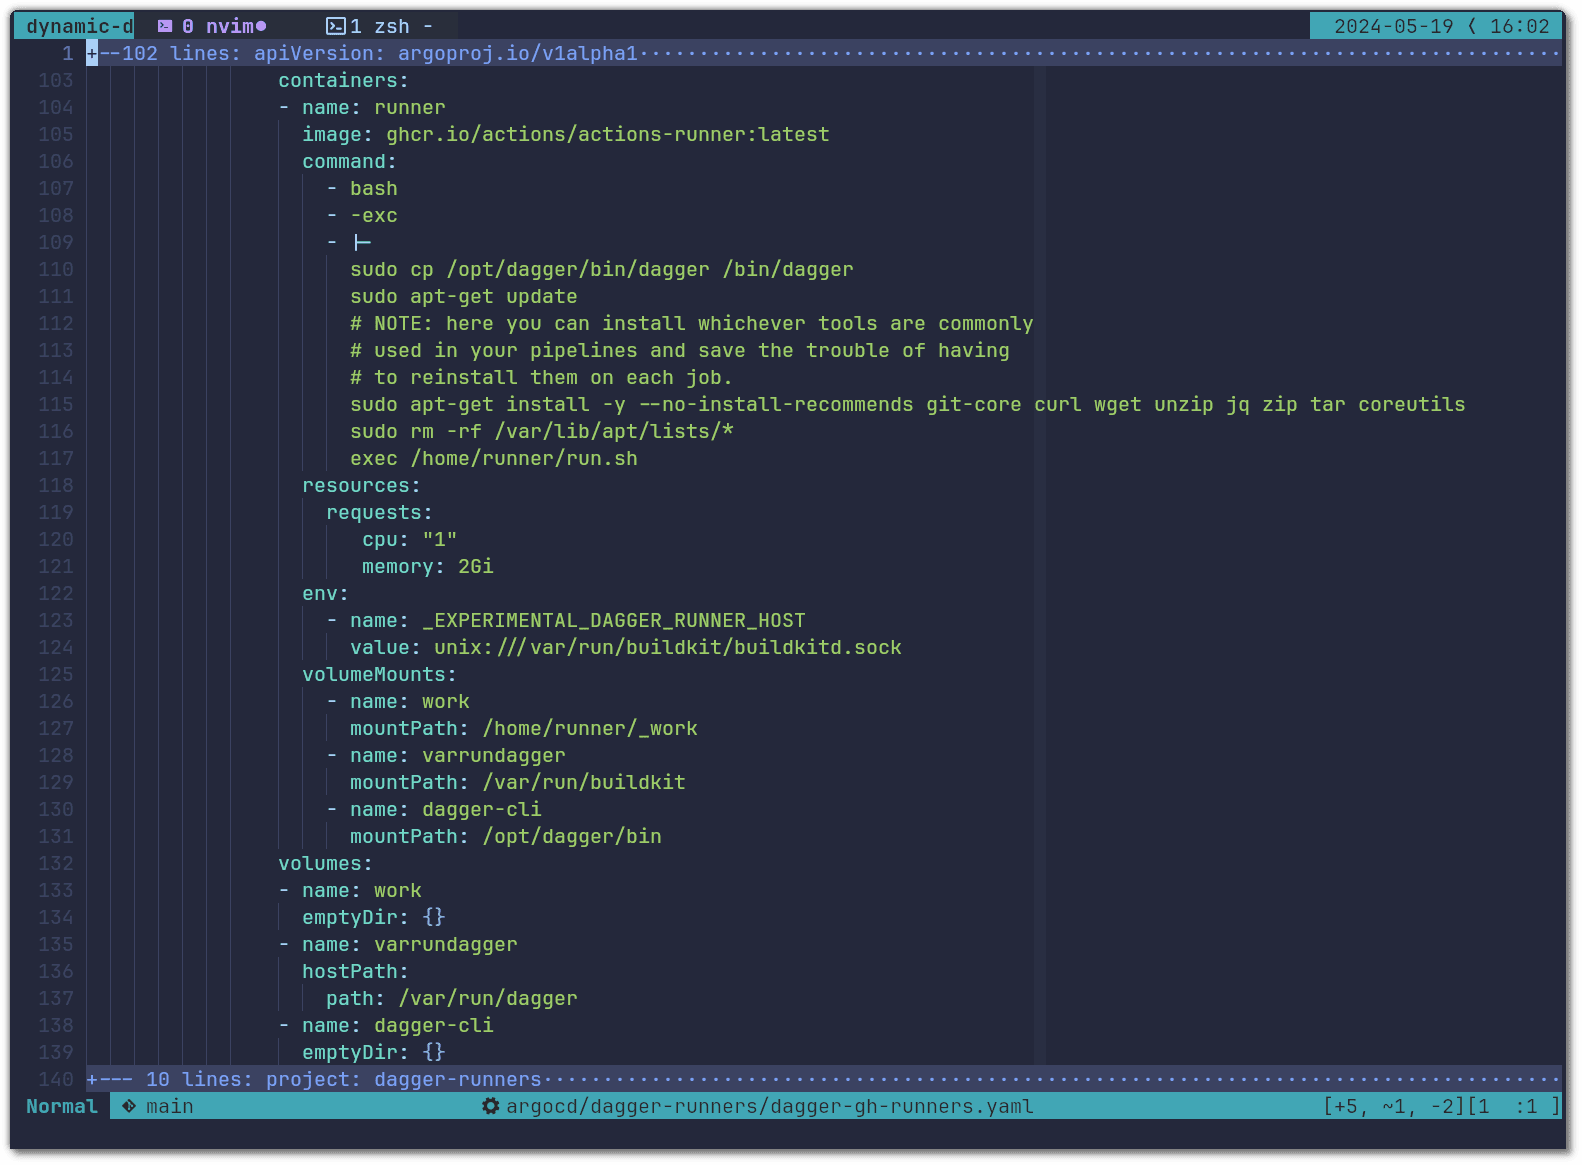
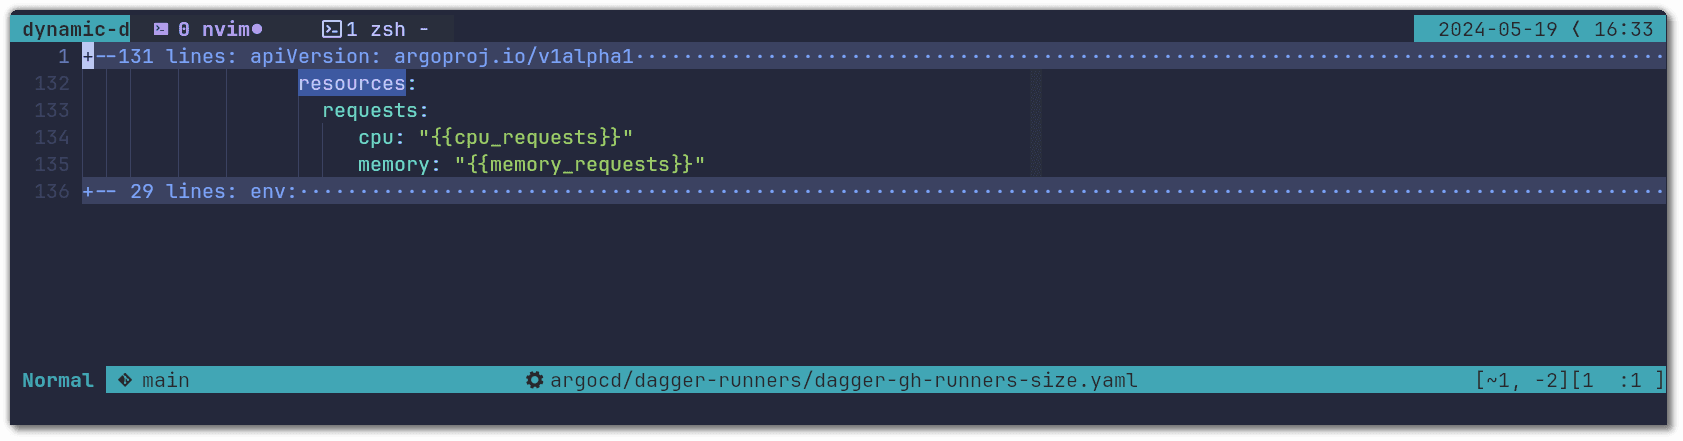
In the configuration above you will see that we specified the resources for the runner container (1 core and 2GB of RAM). However, as you will see below, we do not configure resource requirements or constraints on the Dagger Engine containers. This is intended and it is due to the requirements different jobs have and how they get assigned to Dagger Engines. Having many runner pods connect to a single Dagger Engine is a good way of reusing cached operations across different runs. In our case, some jobs that GitHub Actions Runners pick up are small and require little compute resources, but others may need at least 16CPUs, 32GB of RAM and an entire NVMe disk to themselves. Due to this difference, sizing the GitHub Actions Runners pods instead of the Dagger Engine will determine how many can run in parallel on the same Dagger Engine.
Given a c6id.12xlarge host, our configuration is able to run efficiently:
- Up to 2 large pipelines, each requiring 16CPUs, and maybe a few smaller ones (i.e. our Engine tests are particularly resource intensive)
- Many small CI jobs - up to 30 in our case (i.e. all our linting, scanning, and notification pipelines don’t require a lot of resources)
- A mix of the above
Regardless of the mix, there will be a single Dagger Engine on a node with no resource constraints, and as many GitHub Actions Runners as available resources permit.
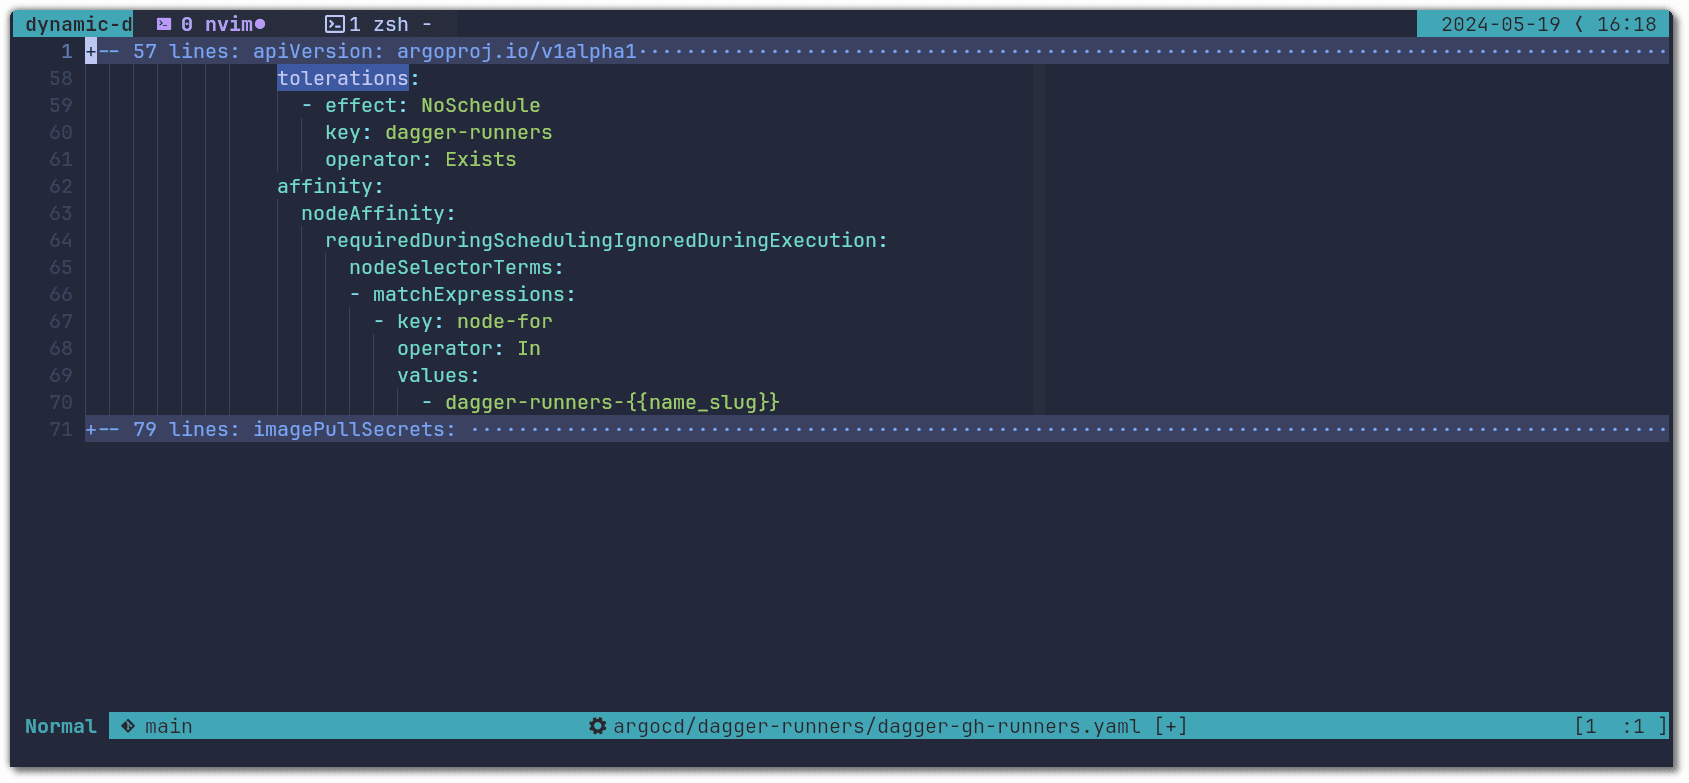
Lastly we configure the tolerations and nodeAffinity that makes it so that runner pods are only scheduled on nodes dedicated to the targeted Dagger version:
Dagger Engines
To learn more about how to install and configure the Dagger Engine you can check out this page. And you can see the full application here.
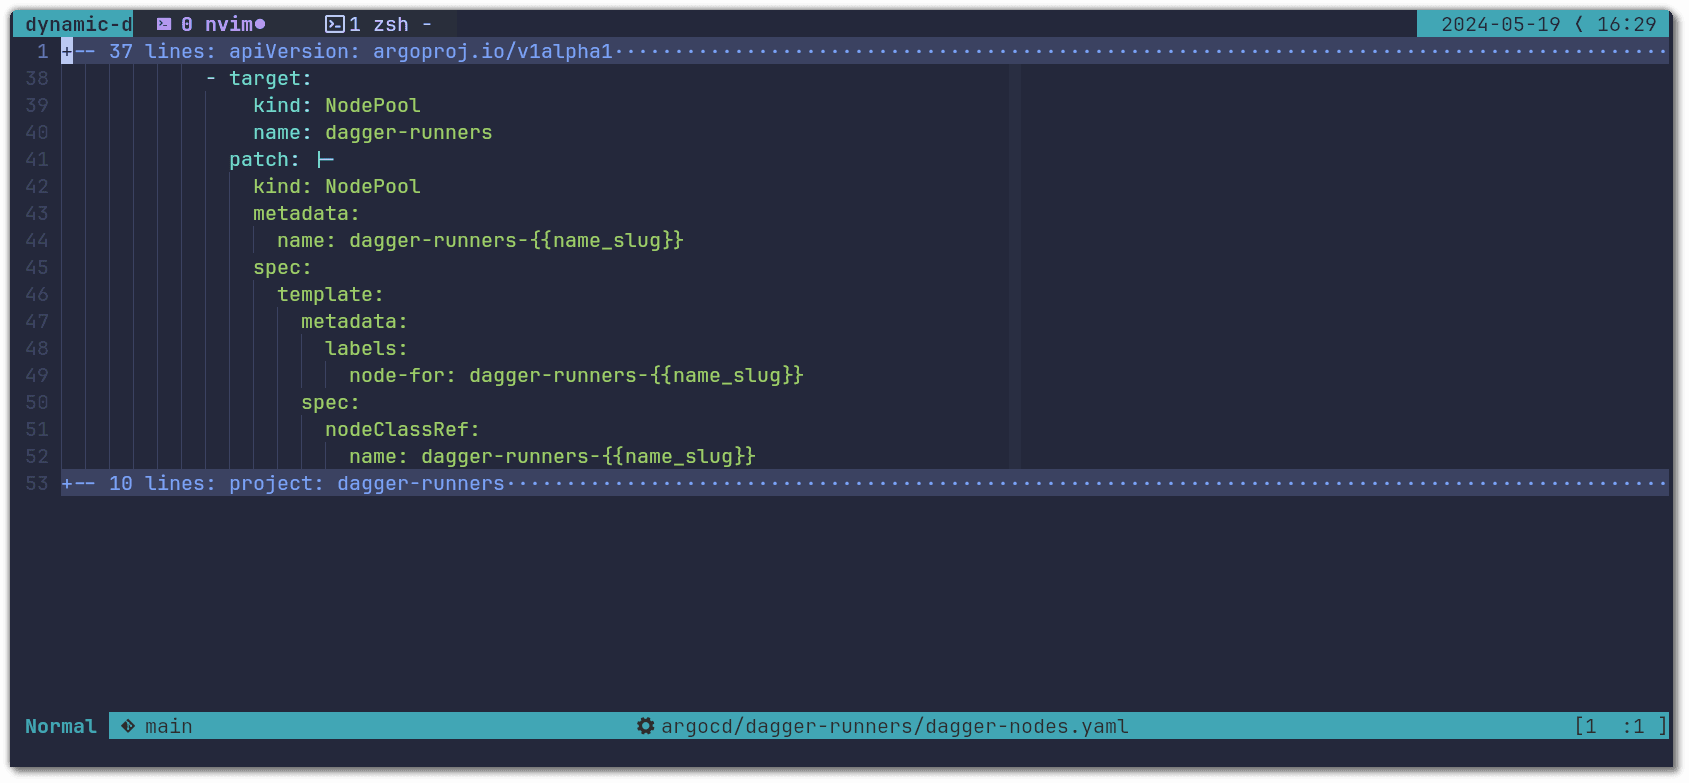
There are two main parameters from the helm chart that we need to configure for the Dagger Engine to target the required version and run only on the nodes dedicated to said version: the version of the image and the tolerations & node affinity:
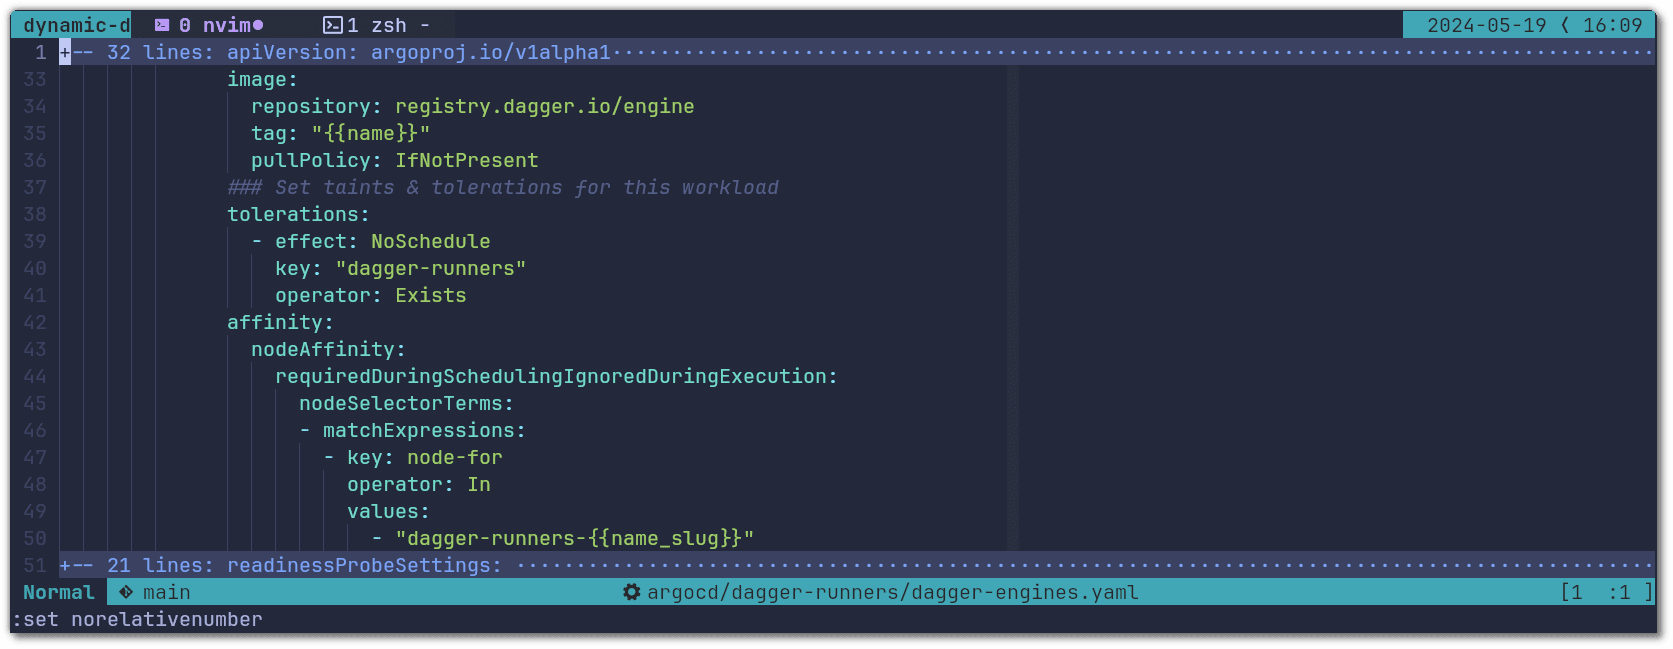
You will see that for the nodeAffinity we are using a variable called name_slug. This is made available by the argocd-github-release-generator and it is a URL friendly version of
Nodes
You can see the node pool and class configuration here.
Which nodes you provision will depend on your Dagger pipelines. In our experience, pipelines tend to be disk & CPU bound, and instances with the following properties are most reliable and fast:
- CPUs with a high single-core performance (a.k.a. CPU-optimized instances)
- NVMe disks
On top of this, you want to use the NVMe disk for Dagger’s state directory. Here is an example of how to configure these with Karpenter’s NodeClass and Amazon Linux 2 instances:
When it comes to choosing instance types that really depends on your particular usage. In the case of the dagger/dagger repository, we have really heavy usage throughout the entire day. Each commit pushed to main or a pull request runs a large number of heavy pipelines. Due to this we chose big machines, particularly c6id.12xlarge & c6id.16xlarge, since they will be able to run a significant number of jobs and have a higher chance of caching between runs. There are many ways to configure which instance sizes get spawned by Karpenter. You should review and change according to your needs, that configuration can be found here.
The final configurations that will tie all of this together are the taints that need to be applied to each node:
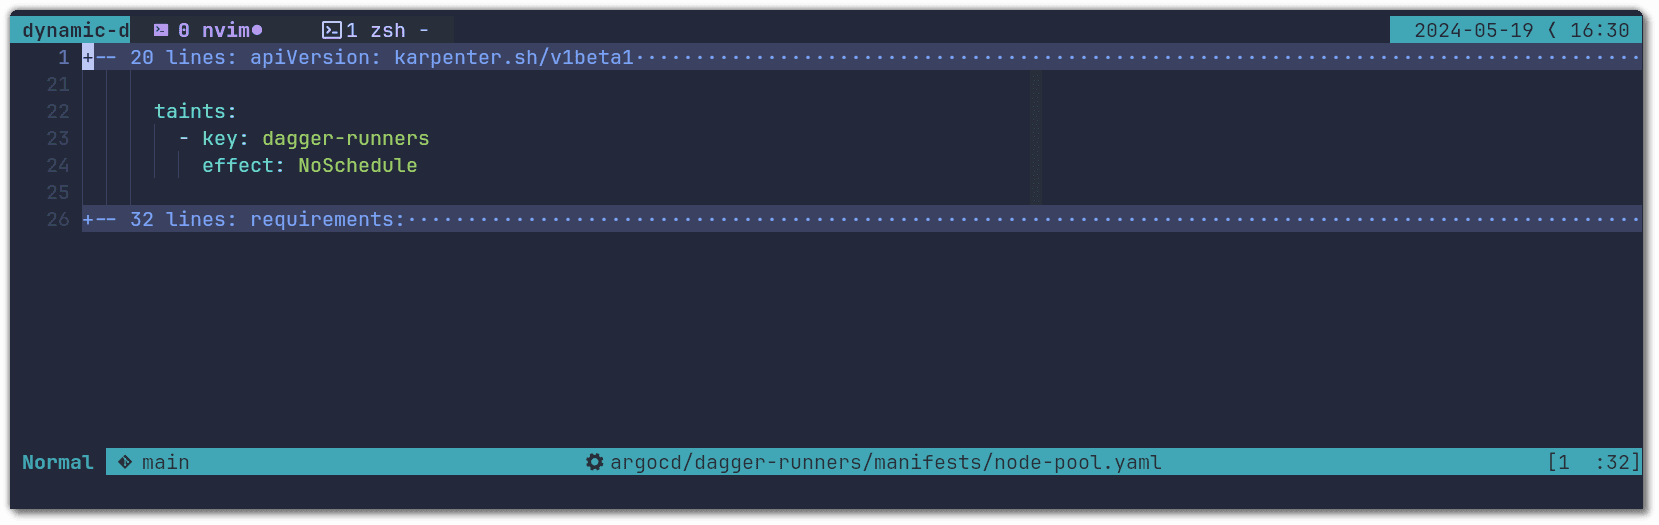
And the labels that make each node specific to only one Dagger version:
The reason for having a generic dagger-runners taint and a specific node-for label is for cases when you want to schedule a pod on every single node no matter the version, for example metrics-related pods like a prometheus node exporter.
Optional: dynamic resource requests
It is fairly common to have some pipelines that are heavier than others and as such require more resources. In the setup above we mentioned that we allocate the resources at the runner pod level and we let the Dagger Engine run freely without any limits. We prefer this approach because it gives the developer the flexibility of choosing the appropriate size for them. In order to give them the control of how many resources the runner pod requests (that the Dagger Engine will use) we can leverage Argo CD’s matrix and list generators. Instead of adapting the dagger-gh-runners ApplicationSet we will create a new one called dagger-gh-runners-size. You can check out the entire ApplicationSet here, inside the argocd/optional folder. Just like we did for dagger-gh-runners, you should configure the contents of githubConfigSecret and githubConfigUrl, after that you are ready to apply:
kubectl apply -f ./argocd/optional
There are three main differences worth reviewing. First we combined the argocd-github-release-generator with a list generator that defines different resource combinations:
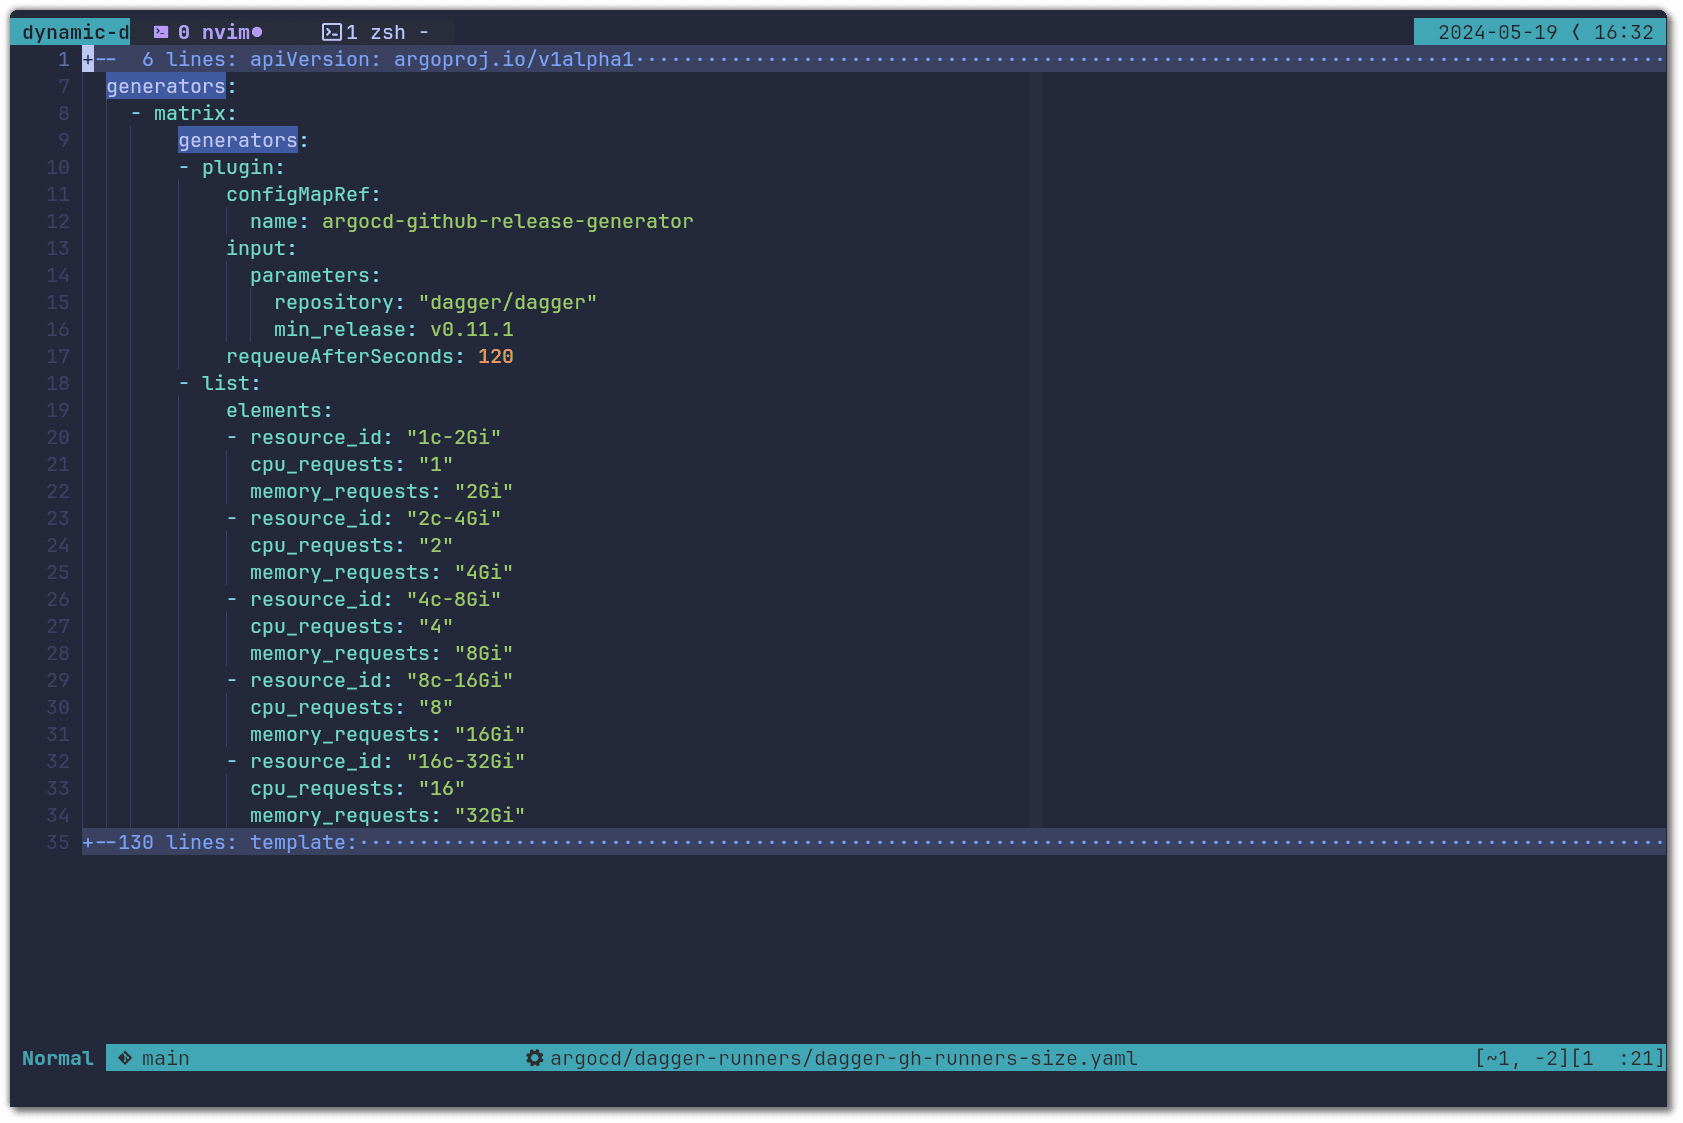
Then we used the variables defined in the list generator when specifying the resource requests for the runner pod:
And finally, we changed the name of the runner to include the resources being requested:
Now developers can target bigger runners by simple specifying it in the name: runs-on: dagger-v0-11-4-16c-32g

Wrap up
The setup that we shared above is what we are currently using for all our Dagger pipelines, including those coming from contributions to Dagger. Feel free to check out our public GitHub Actions Workflows. If you look at a job, you will notice dagger-runner-v2
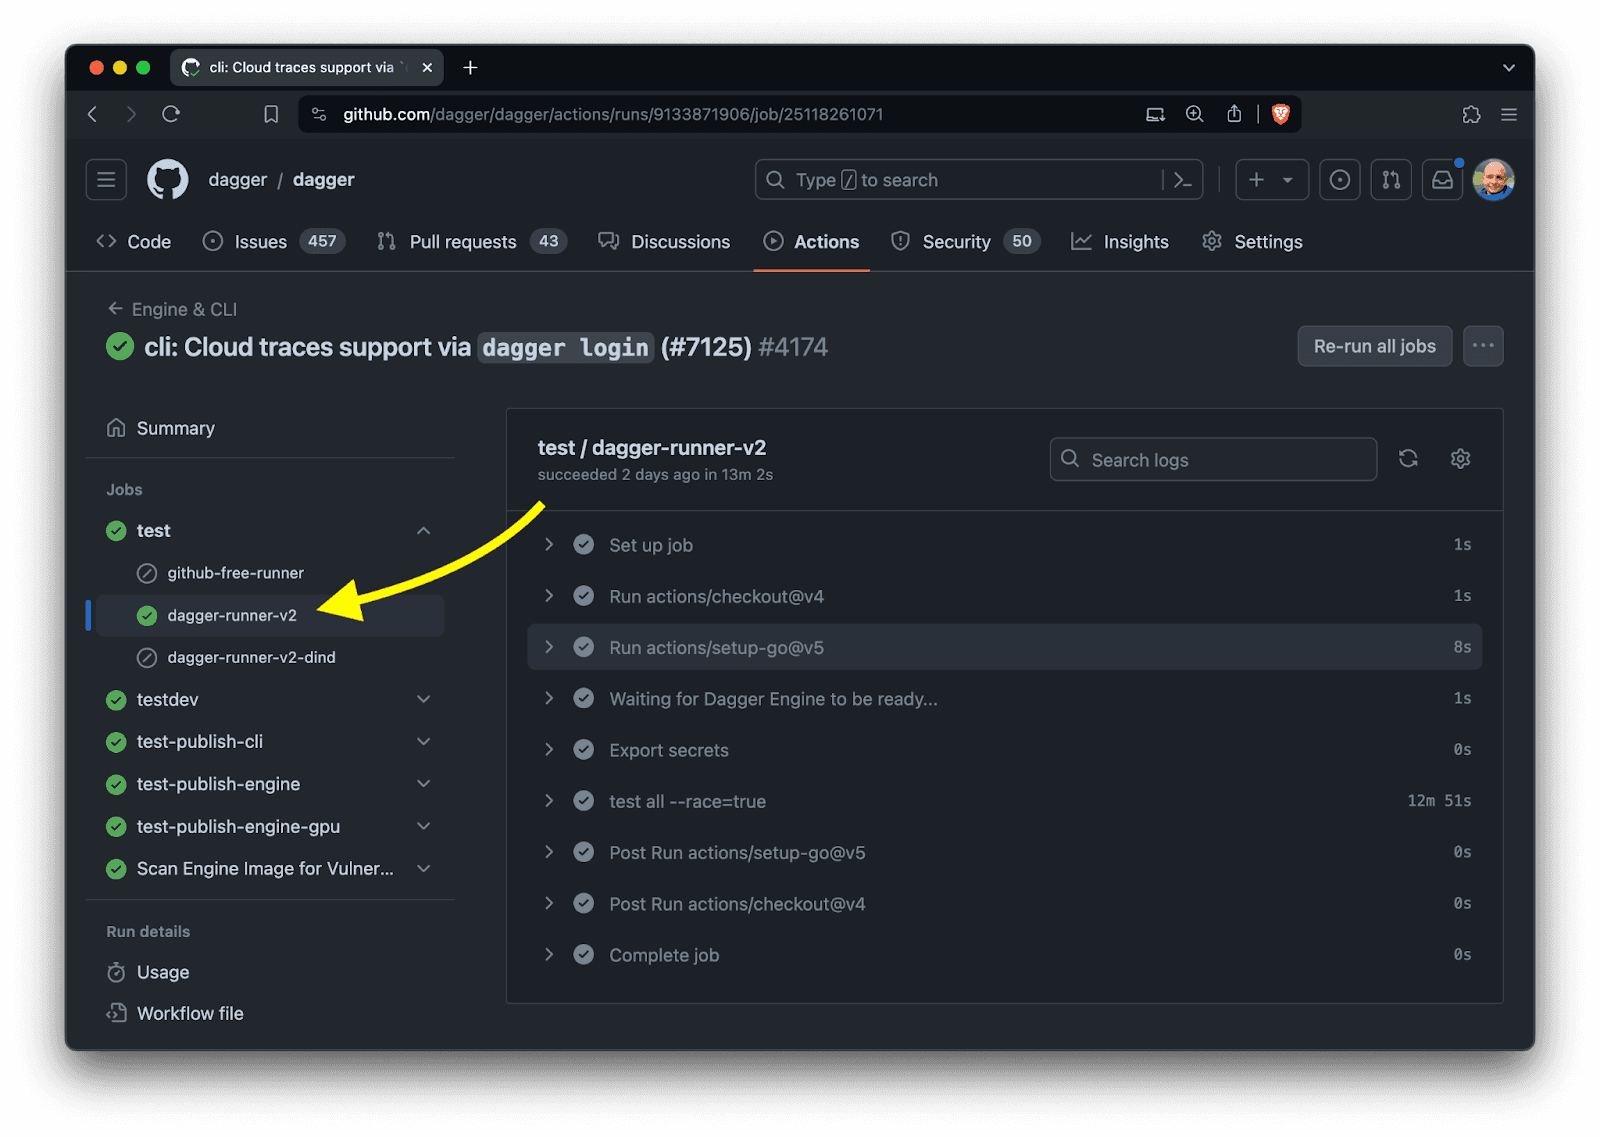
This captures the second generation of our Dagger Runners implementation which is:
- More efficient with CI jobs getting scheduled more quickly & Dagger Engines stopping more quickly.
- Easier to maintain since new Dagger versions become automatically available. Our developers decide when they want to upgrade to the latest version. Different workflows can be configured to use different Dagger versions & configurations.
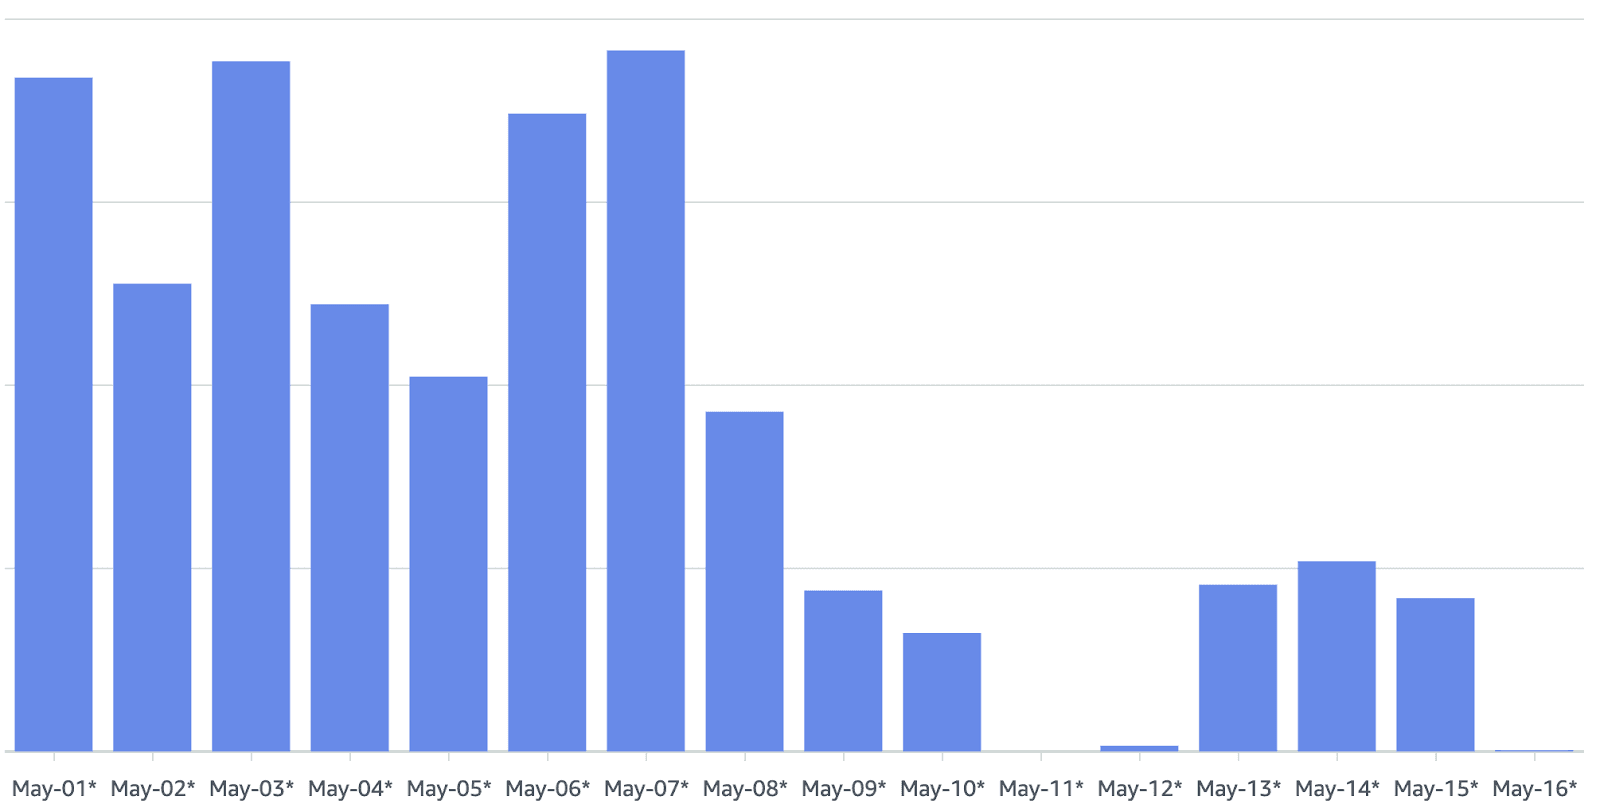
- Significantly cheaper. We achieved an 80% saving in EC2 costs.
This last point is especially important since everyone wants a fast CI that is also cheap to run. We hope to dig deeper into the cost aspect in a future blog post. For now, here is how the costs changed after we switched to On-demand Dagger Engines with Argo CD and Karpenter. The change went live on May 9th:
If you are already running Dagger in production on Kubernetes, we encourage you to try out this new approach and let us know how it works out for you. If something could be made clearer, or if you hit any issues, let us know! Discord or GitHub are the best way to do so.
If you run Dagger in production in a different way, we would also enjoy hearing from you. We are especially interested in what works well, and also what could be better for your production context.
Meanwhile, we already started working on the third version of Dagger in production. We are experimenting with running GitHub Actions Runner in Dagger, as a service, rather than alongside. We also have an experiment with BuildKite Agent running as a service in Dagger. If this sounds interesting here are a few GitHub issues that are worth watching: